💡The " Notion Life Community " is now open!
By subscribing, you can read all paid articles , and you also get benefits such as Notion support for questions and study sessions . Click here to join the community where you can connect with many Notion users!
Notion is constantly releasing new features. This time, we've gathered some of the new features that will make your pages even more stylish!
New features include the ability to change colors and the ability to enjoy simpler page designs.
Please try out the new features that interest you!
🎬 Director: Rei
✍🏻 Writer: Mino Kurumi
1. How to add color to buttons
Notion's button feature was released last year.
Previously, it was not possible to change the color, but with the update, it is now possible to change the text color and background color.
Before

After

You can change the colors from Notion's default 10 text colors and 10 background colors. You can assign your favorite colors to create a more enjoyable page design.
🔧 How to set it up
Hover your cursor over the button, click the "⋮⋮" mark that appears, and select your favorite color from "Color."

It is recommended to change the color to the theme color of the page or to match the color of the icons to create a sense of unity.

🔗Click here for a detailed explanation of the button functions!
2. Make a simple table colorful
Next, we will introduce new features related to color changes.
As the name suggests, the Simple Table feature allows you to create simple tables. Previously, you could only set the color of the headers, but with the update, you can now set the color for each row and column in detail.
Before

After

You can set both the text color and background color using the following method. You can change the color of not only vertical columns but also horizontal columns in the same way.

🔧 How to set it up
Click the ":::" mark that appears when you hover the cursor over a simple table, then select the row or column you want to change the color of. Select the color you want from "Color."

Simple tables are useful when you want to create a simple table but don't want to create a database.
By rearranging the colors, it seems like it will blend in better with the page.
3. Hide the database icon
Next up is an update to the page icons that can be set for each page in the database.

This is very useful when you want to distinguish between pages, but it can be a bit of a hassle to set up if you have a lot of pages.
However, if you don't set an icon, the default icon will look like this, which is a bit of a problem as it doesn't look very good.
You can now finally choose whether to show or hide these page icons!
Before

After

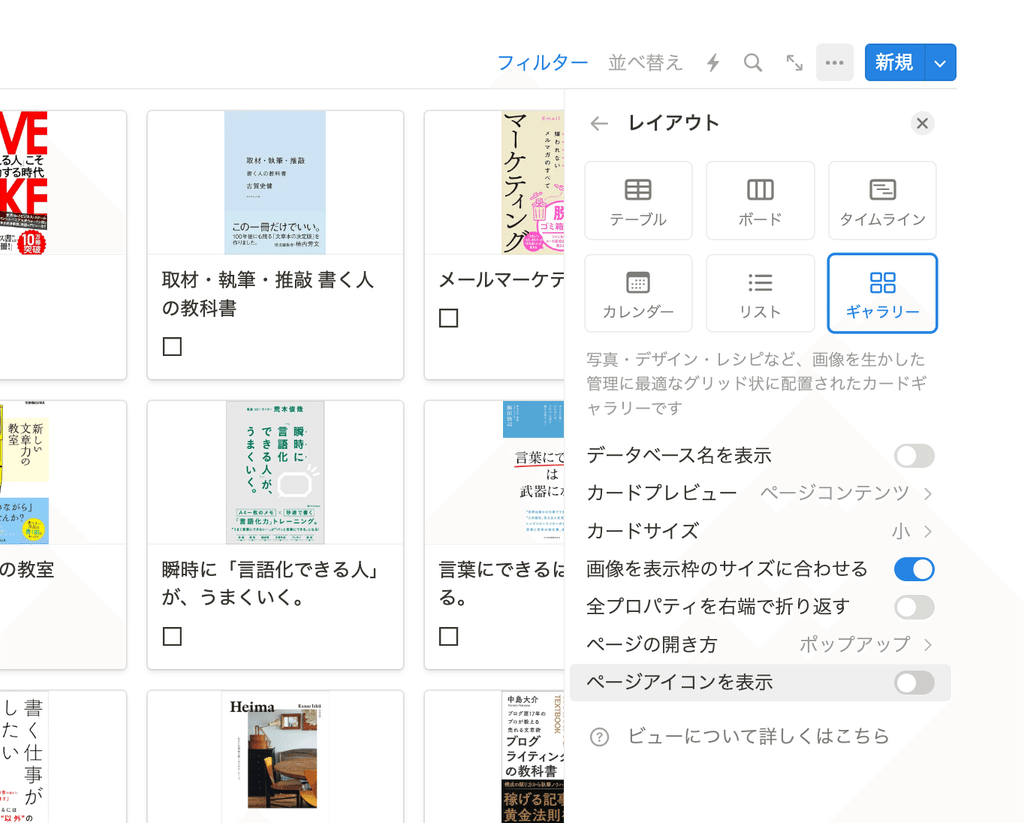
🔧 How to set it up
Click "Layout" from the "..." in the top right corner of the database. Turn off "Show page icons."
(The same settings can be made for other views as well)
Now your database looks simpler and more enjoyable.
In addition to the book list, you can also hide the icons for web clips, recipes, and other items shared through Life and Notion, which will give you a cleaner look. Give it a try!
4. Hide Saturdays and Sundays in the calendar view
Calendar view allows you to view your database by month or week in a calendar format.
Did you know that you can actually display the calendar only for weekdays, Monday through Friday?
Before

After

If you don't need the weekend borders, such as for work pages that you only see on weekdays, you can turn them off to make the calendar appear larger and cleaner.
🔧 How to set it up
Click "Layout" from the "..." in the top right corner of the database. Turn off "Show weekends."
(This can only be set when the calendar view is selected.)

The great thing about this app is that the calendar remains visible even when the display width is reduced. It also makes it easier to view when you want to display the calendar in two columns.

5. Crop images on the page
Finally, we will introduce a useful function for pasting images onto a page.
You can place, paste, or upload images anywhere on a Notion page, but now you can crop images right on the page!
Before

After

Previously, we had to re-upload images, so this is a very welcome update...!
🔧 How to set it up
Click on the pasted or updated image, click on the crop mark in the top right corner, change the crop frame to the size you like, and click "Save."


If you want to re-crop the image, you can change the cropping using the same steps. This will make arranging images even more convenient!
summary
That's it for the new features that make Notion even more stylish!
Please update your Notion to make your pages better with these new features.
Click here for a list of Notion templates available on "Notion in Life" !

The book "Notion Life Hacks" is now on sale! It includes 36 templates and provides plenty of practical tips on how to use Notion.

We also introduce how to use Notion and specific examples of its use on YouTube , so please take a look if you're interested.

We will continue to provide information about daily life and Notion to help you get the most out of your busy days.
Thank you for reading to the end!
See you in the next article.


![[Study Group Report] We held a Notion Formula Study Group!](http://kurashi-notion.com/cdn/shop/articles/2510_notionblog_formulaseminar_967275ed-a27f-4af8-ab02-34ca3ee3f96a.jpg?v=1762425140&width=1920)